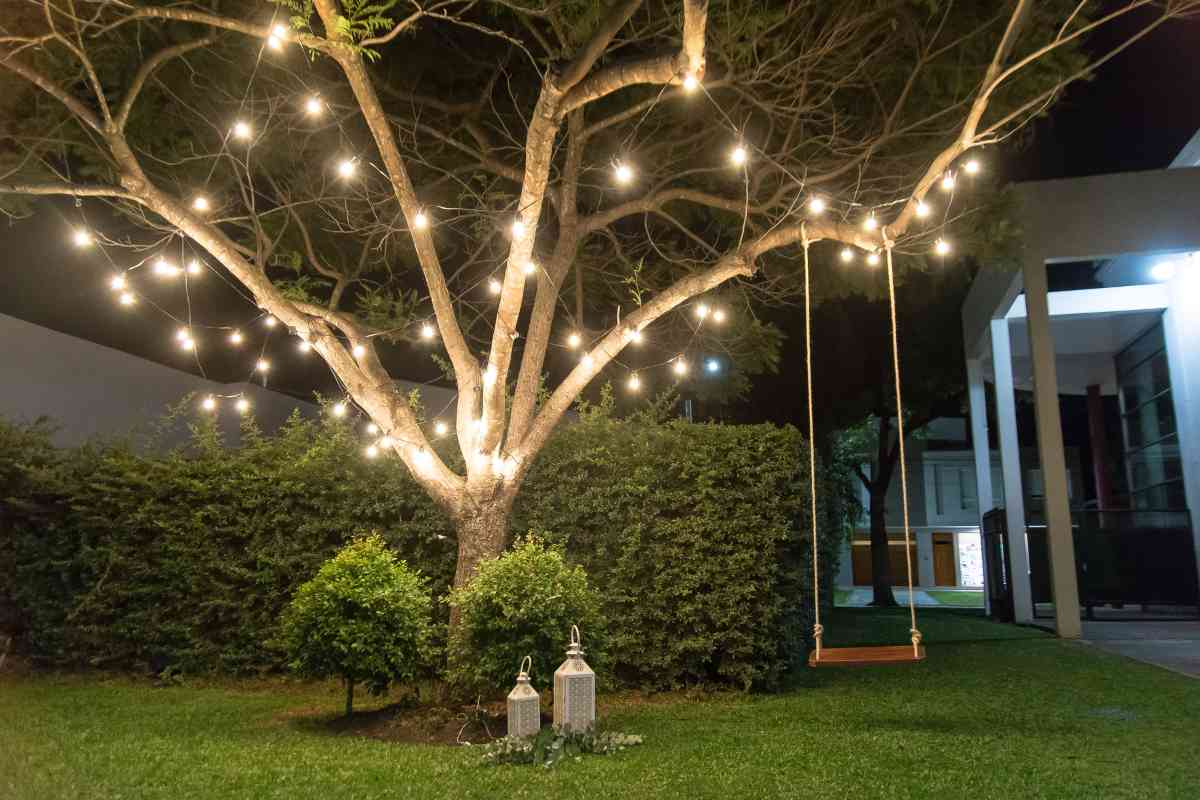
Trees possess a remarkable ability to infuse vertical emphasis and instill a sense of drama into the nocturnal scenery. By delicately illuminating their intricate and ornate branches, we can truly revel in their enchanting beauty when night falls.
Central to the art of tree lighting is the focus on its core, particularly the majestic trunk.
Placing an uplight at the base of the tree unveils the texture, color, and captivating patterns of its bark, allowing them to be admired with newfound appreciation.
However, the impact of tree lighting extends beyond the tree itself.
Lighting trees has the power to define the landscape, creating a harmonious interplay between the tree and its environment.
Picture this; a small specimen tree nestled amidst a thicket of dense shrubs. By employing up-lighters strategically positioned around the tree’s perimeter, we can not only highlight the tree’s elegance but also showcase the surrounding shrubbery, establishing a captivating presence within its context. This highlights the tree as a focal point relative to the surrounding.
With landscape lighting design, your imagination comes into play, allowing you to creatively experiment with shapes and juxtapositions.
Lighting Trees: Factors to Consider

When illuminating trees using a low-voltage lighting system, it is essential to consider several important concepts;
- The tree’s structure, shape, and size
- Light Penetration
- Viewpoints
- Light intensity (lumen output)
- Beam Angle (Beam spread)
- Color temperature
Tree Size, Shape & Structure
When it comes to illuminating trees, consider their structure and canopy density as they directly influence light penetration.
Take a step back. Assess the tree’s shape, geometry, and any potential limitations to installation posed by large roots, nearby paving, water features, or specific viewing angles.
An open structure within a tree allows light to gracefully travel through the canopy, beautifully illuminating the trunk and branches. As a general rule, if you can stand at the base of the tree and see through the canopy to the upper branches, uplighting is likely to achieve remarkable results.
However, some trees, especially conifers with their dense canopies, may not pass this simple test. Uplighting these trees from below may yield a green glow that fades before reaching the upper branches.
For such cases, a more effective approach involves bathing the exterior of the tree with light, thereby unveiling the captivating form, shape, and intricate textures of its needles. Additionally, uplighting the trunk can add a touch of dramatic flair to the overall display.

The positioning of light fixtures relative to the tree plays a significant role in achieving the desired effect. Determine which unique features of the specimen tree you wish to emphasize, and decide whether lighting from within the canopy or outside of it, or both would be more appropriate.
Illuminating the tree from within creates a stunning contrast against the silhouette of the canopy.
For dense trees and shrubs, exterior lighting with an appropriate beam angle is the key to revealing their intricate shapes.
Placing lights on the front and side of the tree accentuates its form and texture. Meanwhile, positioning a light behind it, directed towards a wall or hedge, and another light to the side creates a captivating silhouette that highlights the tree’s outline and size.
Simultaneously lighting the inner and outer canopy from a distance is also possible. But it is crucial to strike a balance to ensure one effect does not overshadow the other.
This technique works best for deciduous trees with ample canopies. The inner light highlights the trunk and canopy from within, while the outer light reveals the tree’s magnificent form and shape.
Tree size
- Tall Trees: For exceptionally tall trees, the use of powerful lights is necessary. Position at least one spotlight with a narrow beam spread, no less than 2 meters from the trunk, pointing upwards to elegantly graze the trunk. An additional two or three lights with wider beam spreads are positioned away from the trunk, angled appropriately to accentuate the branches and canopy. Opt for luminaires equipped with an ellipse lens to illuminate the tree without significant spillage, ensuring comprehensive coverage of the entire tree.
- Medium-sized trees: For medium-sized trees boasting dense canopies, cross-lighting proves to be ideal. This technique involves strategically placing two luminaires to gently wash the outer canopy. Additionally, you may choose to add an inner light to gracefully graze the trunk, further enhancing its allure.
- Small trees: Even a small specimen tree can be brought to life with just a single well-placed fixture, providing adequate illumination that highlights its unique beauty.
Smaller trees require a single light, while larger or wider trees may need two, three, or even more lights for full illumination.
Lastly, consider the feasibility of lighting during winter. Dormant deciduous trees reveal their striking branching structures dramatically when illuminated.
Take advantage of this to showcase trees with appealing branching patterns, allowing their captivating forms to shine brilliantly under the nighttime glow.
Light penetration
With evergreen trees, achieving sufficient light penetration throughout their dense branches and foliage can be difficult.
When lit from below, the thick foliage often obstructs light, preventing it from reaching the upper portions of the tree.
To avoid creating a glaring hotspot at the base of the tree, it is recommended to employ a different approach.

Instead, light evergreens from a distance using a fixture with a 60° beam spread. This broader beam angle allows for a more even distribution of light, ensuring that the entire tree is beautifully illuminated.
It’s worth noting that the specific distance and beam spread may vary depending on the size of the tree. Larger evergreens typically require the light fixture to be placed further back to achieve the desired effect and avoid overpowering any specific area.
However, there is an exception; majestic towering evergreens with low-hanging branches. These established giants, with their sprawling branches, offer a unique opportunity for direct lighting from below. In this case, a narrow beam spread lamp with an angle of approximately 15° can be employed.
By positioning the light at the base and aiming it upwards, the light gracefully ascends the trunk, brilliantly illuminating the canopy from within. The large and spread-out branches of these towering evergreens still permit upward light penetration, resulting in a truly captivating display.
Fixture placement
The fixture will depend on the size of the tree. Towering evergreen typically requires upward light directly from the base.
Also, consider the tree’s growth. Placing the luminaire too close to a young sapling may result in tree branches growing over and around them in a few years. The light fixtures may need adjustment as the tree continues to grow.
In-grade well lights (recessed ground lights) placed in the lawn can provide a solution ensuring the fixtures remain unobstructed by the expanding branches
Viewpoint
Think about the viewing angle. If you have chosen specific trees to highlight, the positioning of lights will depend on where they will be viewed from.
The viewpoints could be from the back patio, the entrance to your property, or a specific window from the house.
You will want your specimen trees to be visible from all viewpoints and this will influence the number of lights required. More viewing angles may necessitate the use of additional lights.

For wider and robustly shaped trees like Canadian Hemlocks, 3 to 5 lights may be necessary. Taller evergreen typically requires only one to three lights at their base for various viewing points.
Light Intensity (Lumen output)
Lumen output measures the perceived brightness of a light. This is not the same as wattage although higher wattage lamps tend to have a higher lumen output.
The light intensity of the light source depends on how bright you want your subject to be and how far you would like the beam to reach. You can opt to have some trees brightly illuminated to make a statement or choose a soft, inviting glow for a more subtle effect.
Keep in mind that the further the light has to travel the lower its intensity. The beam angle will also affect how bright the light is with wider lights having a lower intensity.
Light-colored foliage, bark, or flowers will always stand out even with relatively low-powered fixtures. The same applies to colored trees with translucent leaves, especially those in red or orange shades. Avoid excessive lighting for these subjects, as it can become overwhelming.
Opt for fixtures that allow you to adjust the lumen output. Dark foliage and bark may require two or three times more lighting compared to lighter-colored subjects to achieve a similar effect.
Take advantage of the darkness within the tree by lighting up through the center, creating a silhouette of dark foliage against an inner glow.
When illuminating trees, different lighting requirements should be considered based on their height.
- Trees up to 1 story tall: A fixture emitting approximately 300 lumens is recommended.
- Trees between 1 and 2 stories tall: Around 400 lumens is required for uplighting.
- Trees exceeding three stories: Fixtures with a maximum output of 1600 lumens can be utilized for optimal lighting.
Beam Spread (Beam Angle)
The beam angle measures the spread of light from a source. As light travels away from the source, it spreads out and becomes less intense.
Consider the width of the trees you wish to illuminate. Wider and more robust trees like a weeping willow will require a wider beam spread.

Meanwhile, taller and narrower trees like giant sequoia or wellingtonia will benefit from a narrower beam spread.
An angle of about 24° would be suited for a slender silver birch, 60° would be appropriate for a weeping or spreading canopy and 36 to 40° would suit most tree shapes that fall in between. Conversely, a large willow tree with a broad canopy may require multiple wide luminaires.
Color temperature
Color temperature, measured in Kelvin (K), is a crucial factor that determines the color of light emitted by a source.
Lower color temperatures, below 3000°K, produce warm-colored light with orange or yellow hues. On the other hand, higher temperatures (over 4500°K) result in cool-colored light with a bluish tone.
Warm lights tend to highlight the warmer colors in plants, while cool lights emphasize cooler colors.

When it comes to trees, warmer lights accentuate the tan, brown, and orange tones on the bark and branches, while cooler lights bring out the green and silver hues in certain leaves and needles.
For deciduous trees, it is recommended to use warmer lamps with a color temperature of around 2700°K. In the case of evergreens, cooler lamps ranging from 3000°K to 3500°K work best.
These cooler lamps enhance the dark green tones in pine needles. Blue spruces, known for their unique colors, can benefit from a 4000°K lamp, which adds a hint of blue and silver to their appearance.
The color temperature is particularly critical when lighting smaller ornamental trees.
Tree Lighting techniques
Deciding which trees to light and which techniques to use requires careful consideration.
Lighting larger trees close to an exterior viewpoint, such as a terrace may have a majestic impact if the luminaire can be shielded from view. But the same tree close to the house may be seen only as a blob of light from a window.
The farther the tree is from the viewpoint, the more brightly it must be lit if it is not to fade into the distance.
Uplighting
Uplighting is the most common technique used to illuminate trees. This is essentially lighting the trees from inside the canopy from a spotlight beneath.
For smaller trees, if you are using a single luminaire, position it close enough to the base to illuminate the trunk from near the ground, but not halfway up, as this would create an illusion of the tree floating in midair.

Choose a lamp with a sufficiently wide beam to light a significant portion of the canopy. Placing the light close to the trunk will emphasize the texture and color of the bark.
For mounting the spotlights, spike-mounted luminaires are generally preferred as they are less likely to be obstructed by ground cover compared to recessed-up lights.
However, recessed-up lights are more suitable for illuminating specimen plants in open gravel areas.
- Trees with attractive canopies and shapes are best illuminated from outside the canopy. Using a stake-mounted floodlight positioned at a bed can achieve this effect.
- For trees with dense-textured canopies, a grand effect can be achieved by lighting near the side of the canopy.
- Larger, mature trees with an open structure can be effectively lit using a combination of narrow beams to highlight the trunk and one or more under beams to emphasize the canopy’s structure.
Cross lighting

This is when two light sources (up lights) are used on either side of the tree or shrub and aimed to cross each other on the subject creating depth and visual interest.
The light should not be overpowering as it can result in a washed-out look.
Downlighting & Moonlighting
Downlighting is the opposite of uplighting and involves the use of luminaires mounted high up on a tree or other high structure to illuminate the surface below.
This is particularly important when flowers take the center stage of the garden design also casting overlapping light onto a pathway, driveway, or patio.
Ideally, a tall tree with high branches is preferred but an even smaller tree can work as well for downlighting.

Moonlighting, which involves casting light downward from a tree, offers a subtle way to illuminate grassy areas or herbaceous borders. It creates a natural and ethereal ambiance that enhances the overall appeal of the landscape.
Be mindful not to obscure the light with too many branches, and consider using shrouds that diminish the visibility of the light source.
To run the wire, use the non-visible or least noticeable side of the trunk, securing it with cable ties and stainless-steel screws. Allow room for the wire to accommodate the tree’s growth by leaving some extra length at the base.
For maximum impact, both uplighting and downlighting can be employed together on the same tree. However, it remains important to partially uplight the trunk of the tree to establish a visual connection with the ground.
Relying solely on moonlighting may give the impression that the canopy is suspended in the air, detached from its surroundings.
Backlighting & Silhouetting
For smaller specimen trees, an engaging effect can be achieved by using lighting to silhouette the tree against a wall or hedge.
This involves using a light source to wash the wall or hedge creating a dark outline of the tree (silhouette). Silhouetting brings the tree to life and adds animation to the scene.

However, it is important to note that silhouetting can only be employed if there is a wall or hedge behind the tree that can be illuminated to cast the tree into a silhouette.
Without a suitable backdrop, backlighting will produce a halo effect rather than a clear silhouette.
Shadowing
Another option is to place a spotlight in front of the tree, projecting its shadow onto a wall or surface behind it. This method works particularly well for small maples, creating a visually impactful display.
The play of light and darkness can be quite intriguing, especially if the object is affected by the breeze. Lighting the object from low down and angling upward can have an even more dramatic effect.
Design Considerations
Just because a particular tree is your favorite, does not necessarily mean that it is a good candidate for lighting.
In some gardens there may be many specimens vying for attention, do not be tempted to light them all or light many of them in the same way. You will need to pick out a few really good ones to accent.
Go for contrast and light them from the front or different sides.

Conversely, you can use different light intensities or lamp color temperatures to reinforce the different foliage. Equally do not go for variety where none should exist.
Fill-in lighting in shrub borders is commonly employed to connect illuminated focal points. This allows the eyes to comfortably traverse the entire scene without constant adjustment to contrasting light and darkness.
It is crucial to illuminate enough of the entire garden to provide a sense of balance, cohesion, and depth in the space. Lighting random objects scattered across the landscape fails to establish a sense of place or bring unity and coherence to the garden.
Strive to strike a balance between light and shadows, as overly bright trees can distract from the overall landscape lighting design.
Regardless of the garden style, the shapes created by walls, trees, and shrubs during the day can be emphasized at night. Each situation is unique, and the type of shrubs and trees in your garden, as well as the formality or informality of the design, will influence how you light them.
The positioning of lights should align with the garden style – formal gardens benefit from symmetrically placed lights, while informal gardens can accommodate a more random arrangement.
In larger gardens or those with strategically placed large shrubs or specimen trees, each element should be treated individually while maintaining a unified plan.

Ensure the light sources are not directly visible from the viewpoint by concealing fixtures behind smaller plants. Recessed fixtures are particularly convenient when mowing the lawn will be in order.
In addition, it is crucial to confine powerful lights within the garden boundaries. For environmentally conscious homeowners, avoiding light projection into the sky is also important.
To Wrap Up
It is essential to consider the harmony of the whole scene and the interplay between light and shadows.
Experimenting with different colored lamps or gels can help emphasize natural colors. Yellow-toned light brings out the greenness of deciduous foliage and grass more effectively than green light, which can make things appear sickly.
Conversely, blue light can be a suitable choice for lighting coniferous trees, enhancing their natural bluish tinge.
Consulting with a professional in outdoor lighting, someone well-versed in the art of tree lighting can ensure the best possible results for your garden.
The goal should always be to accentuate and appreciate their natural colors, rather than overshadow them.